
Custom Candle Mold Production: Supplier Path from CAD to Repeat Tools
If you're buying a production path for custom RTV candle molds - CAD lock, prototype pour, then repeat tools - the hard part is usually not copying the shape. It is getting the cooled wax out without tearing the mold, breaking the candle, or leaving a seam across the face. RUUIPON pours reusable platinum RTV candle tools in Bao'an, Shenzhen (Licheng Technology Industry Park, Xinhe Blvd, Shajing; USCC 91440300MA5FAXCN9W) since 2018. Production is MOQ 20 pieces per design. Simple 3D is USD 50 when that CAD scope applies. Prototype is 3-7 business days after CAD lock. Pillar geometry (bark, wick, seam on a column) lives on custom pillar candle molds. The fragrance/bath hub is candle, soap, and wax-melt solutions. Candle tools are not food-contact trays - we will not hang 21 CFR 177.2600 or LFGB papers on a wax cavity.
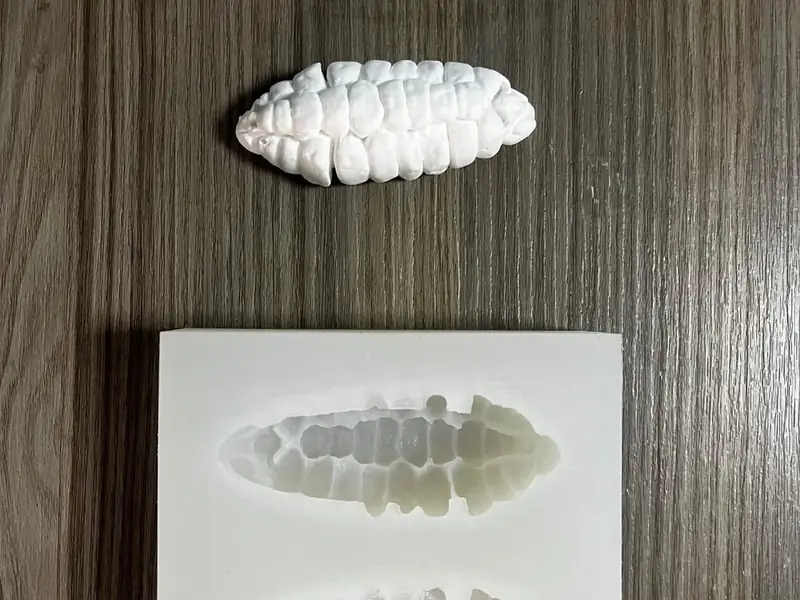
A quilted handbag, a figurine, a textured pillar, and a snap-bar wax melt can all be called candle molds. They still need different splits, support, and wick access. Don't send a generic quote with only a mood-board render.
Where this page sits in the cluster
Use this page when you're choosing a production supplier: one-piece vs slit vs split, jacket on a tall pour, wick in CAD, prototype in the real wax, then MOQ 20 and a reorder archive. If the job is a pillar's bark, draft, and wick pin as geometry, stay on custom pillar candle molds. Soap bars and snap melts as a family: candle and soap solutions. The product SKU is custom silicone candle molds. Wax-melt grams belong on wax melt molds - don't treat them as short candles on this PO.
Start with the cooled candle, not the liquid wax
Wax enters as a liquid and leaves as a relatively fragile solid. Design for shrinkage during cooling, brittle or thin decorative sections, deep undercuts, tall unsupported walls, wick path, seam visibility, and how the operator will demold. A shape that can physically be molded is still a bad production tool if every cycle stretches the same narrow detail.
Typical shop values
Reference values only. Confirm material-specific limits against the supplier’s technical data and agree project acceptance criteria before production. No food-contact row - wax is not a food dump.
| Item | Typical shop value |
|---|---|
| Cavity Shore (pillar / figurine) | Often 30A-40A platinum; peel vs split from the texture, not a default |
| Wax-melt tray Shore | Often 30A-40A; design to grams, not overall inches |
| Mix | Platinum 1:1 or 10:1 by grade; vacuum degas until the foam collapses |
| Linear shrink (tool) | About 0.1-0.3% platinum on the master - wax has its own cool shrink on top |
| Tall / floppy wet pour | Support jacket or rigid shell before you raise Shore A |
| MOQ | 20 mold pieces per design after prototype approval |
| 3D / CAD | USD 50 when that modeling scope applies |
| Prototype | 3-7 business days after CAD lock, poured in the wax you will sell |
| Contact | [email protected] · +86 135 3006 2969 |
One-piece, slit or multi-part?
Simple one-piece mold
Works when the candle has a clear release direction and the silicone can peel without trapping the casting. Examples: simple pillars, shallow reliefs, some geometric forms. Deep bark and two-sided sculpture usually want the pillar geometry page's split call, not a stretched glove.
One-piece mold with a controlled slit
A planned slit can release a 3D form while keeping one main silicone body. Put the slit off the display face and close it consistently during the pour. Randomly cutting the mold after production is less controlled than designing the opening before the master is made.
Two-part or multi-part mold
Needed when deep undercuts exist on both sides, a handle or loop locks the casting, a figurine has crossed limbs, a clean seam must leave the front face, or a simple slit will not close. Registration keys and an external support keep the halves from walking while the wax cools.
RUUIPON Mold Structure Decision
Flat-back melt or shallow relief? Open-back. Pillar or figurine that peels without tearing texture? One-piece. If it cannot peel, keyed split and a planned seam. Wick? Hole, pin, or after-drill - pick one on the drawing. Tall wet wax? Jacket. Sold by grams (melts)? Cavity volume from target fill, then the break groove - different product page.
- Flat-back melt / shallow relief? - pillar / figurine / two-sided -> Can it peel without tearing texture?
- Can it peel without tearing texture? - yes -> Open-back RTV
- Can it peel without tearing texture? - no -> Keyed split; place the seam
Example: a branded handbag candle
Consider an 80-100 mm handbag candle with quilted texture and a molded brand name on the front. Review whether the handle locks, whether the logo is raised or recessed on the finished candle, how deep the quilting can go without an aggressive demold, whether the bag stands on a flat base, where a slit or split can hide, how the wick reaches centerline, and whether a rigid holder is needed so the side walls don't spread. That review beats picking Shore A from a catalog.
Wick access belongs in CAD
A wick hole is a small feature with a large effect on mold life. If the operator keeps pushing a thick needle through an unreinforced thin wall, that puncture becomes a tear start. Options: molded wick channel, designed wick pin, local reinforcement, opening through the split, or a post-demold wick method. The mold should not force the same damaging puncture every cycle.
Seam placement is a cosmetic engineering decision
On a decorative candle, the visible failure is often a seam across the face, logo, or smooth front. Consider the retail view, expected cleanup, symmetry, texture that can hide a seam, fragile features near the split, and how the mold opens. Moving the seam 10-20 mm can add a little tooling work and save finishing on every candle.
Tall molds need support before they need harder silicone
A tall soft mold can bow when filled with hot wax. Raising hardness may help some designs and can make demolding worse. Prefer thicker structural zones, an external sleeve, an FRP or rigid shell on a large sculptural tool, a frame around multiple cavities, or a better base. Fill the prototype to the intended wax level and watch it cool. Empty-mold stiffness is not loaded stability.
Shore hardness should be selected around demolding strain
A heavily undercut figurine may want a more flexible peel. A large simple pillar may want support more than a harder rubber. A multi-cavity melt tray wants flatness. Use Shore with wall thickness, feature depth, mold size, jacket, and wax stiffness at demold. Don't specify "30A because candle molds are 30A" without the part.
Wax type changes the prototype test
Paraffin, soy blends, beeswax, and other formulas differ in shrink, stiffness at demold, surface, fragrance-oil load, and preferred pour/release temperature. Validate with the wax you will sell. Check fill, detail, seam, release, fragile features, dimensional stability, wick setup, and closure/support.
Branded detail needs a production limit, not just a render
A logo can look sharp at 500% zoom and fail in wax. Review minimum stroke, relief depth, inside corners, draft on vertical lettering, distance from the split, and whether small islands will tear the silicone. If the mark is critical, approve a real wax casting before production - not only the CAD render.
Reorder control for seasonal candle collections
Candle brands often launch several shapes over time. The useful asset is an approved archive: CAD/master revision, silicone grade, split/slit location, wick solution, prototype casting photo, mold marking if specified, packing method, and reorder history. That reduces drift when a holiday SKU returns.
When this page does not apply
This production-supplier path does not apply if you need pillar geometry as the head term, the candle/soap hub, or a soap / wax-melt product page. It does not apply if you're buying a molded silicone vessel or lid tooled in HCR or LSR - that's an HTV product RFQ here. High-volume metal candle dies are a different shop. A one-cavity hobby mold you'll use twice is the wrong fit for MOQ 20. We would not quote food-contact papers on this wax tool.
What to send for quotation
Send a 3D file or reference photos; finished dimensions; wax type/blend; target candle weight if known; wick position; logo artwork; surfaces where a seam is unacceptable; prototype quantity; production mold quantity; expected monthly output; destination. If the design has a handle, loop, deep cavity, or thin decorative feature, include side and back images. Those features often decide the structure. USD 50 3D only if we still have to model.
RFQs we will not accept as-is
A one-piece glove on a sculpted pillar that needs a hideable seam. Picking candle Shore for a CP soap loaf because the artwork matches. Skipping the jacket on a tall pour to cheapen the quote. Drawing a snap bar from a pretty outline and hoping the grams land. Hanging FDA/LFGB food chrome on a wax cavity. Sending a silicone-part vessel or lid to this RTV queue - use an HTV product RFQ here.
Matched next step
Send candle design, wax type, size, wick plan, and how many production molds you need after a working pour. We'll name one-piece vs slit vs split vs jacket, and we'll say if this is a finished part. "Candle mold, custom" alone is not an RFQ.
Send a candle production-mold RFQ · Custom candle molds · Pillar geometry · Candle and soap hub · Wax melt molds
[email protected] · +86 135 3006 2969 · Licheng Technology Industry Park, Xinhe Blvd, Shajing, Bao'an, Shenzhen. USCC 91440300MA5FAXCN9W.